Engineering a Custom Chocolate Bar
Trials and tribulations of an amateur chocolatier 29 Aug 2019A Warning:
My experiences experimenting with chocolate was surprisingly complex (and expensive). This is just some documentation/narration of my experiences trying to make a custom chocolate bar. If you’re interested in making your own chocolate bar, I recommend reading to get an idea on moving forward.
Context
My dad’s birthday was coming in a month, and I was inspired by a video about homemade custom chocolate bars.
My dad really likes sugar, so a custom chocolate bar seemed like a great birthday present! I assumed this would be really simple (melt, pour, and cool chocolate), but my experiences with chocolate have been incredibly complicated and painful.
Requirements
- The Chocolate should be high quality
- The chocolate has to taste good (in chocolate standards)
- It’d be silly investing time and energy to only re-gift a Hershey’s chocolate bar).
- (Relatively) Inexpensive
- I’m willing to drop a decent amount of money for this birthday gift, but I’m not going to spend hundreds of dollars
- The Chocolate should look professional.
- The chocolate in the linked video looks good, but I feel like it’s missing a fancy flair.
The Ideal Chocolate is Tempered
I assumed that if you melted chocolate it would cool down pack to its original form. Meaning melting good chocolate => good chocolate. However, it’s much more complicated than that.
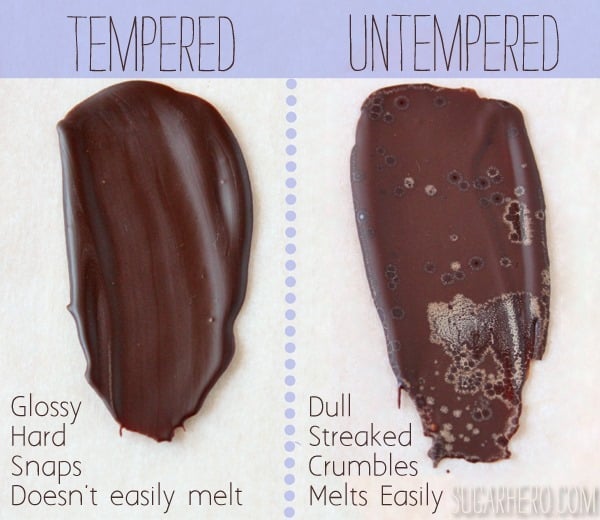
A good chocolate bar is tempered which is defined by a glossy appearance, firmness, and sound when broken. On the other hand, untempered has a dull finish, soft at room temperature, melts in your hands, and after a few days can develop a weird look and texture (which is when the chocolate “blooms” 1). We can see an example below of the visual differences between a piece of tempered and untempered chocolate.
What is tempering?
Tempering is the heating, cooling, and reheating of chocolate to crystallize the fat in the cocoa butter (of the chocolate) into one of six possible forms (beta crystals). When you’ve properly tempered chocolate, the fats in your chocolate will have a stable crystalline structure called the “beta crystal form”.
Tempering is the reason why when your chocolate bar melts and you try to fix it through freezing, the bar melts in your hand and doesn’t taste right. The heat melted the ideal crystals, and when the chocolate reformed sub-ideal crystals replaced the majority of the beta crystals.
There’s a handful of different ways to temper chocolate, but they all follow the same pattern of: heating chocolate around 45°C (melting all crystals in the chocolate), letting the chocolate cool to 31°C (three of the other crystals forms will melt at this temperature - promoting beta crystal formation), and maintaining that temperature to pour the chocolate into whatever shape you want.

Sourcing Chocolate
“Couverture” Chocolate
Another complication with tempering chocolate is that you can’t temper all chocolate. Because cocoa butter is critical to tempering, you need a high quality chocolate that has a high % of cocoa butter (called “couverture” chocolate).
Chocolate companies will use vegetable oil as the fat in their chocolate bars (instead of cocoa) as a cost saving measure. Fortunately, it’s really easy to sort out these lesser quality chocolates by reading the ingredients list (if you see “vegetable oil” in the ingredient lists, it’s not suitable).
Difficulties in acquiring high quality chocolate
Buying couverture chocolate was incredibly hard. The supermarket chocolate all had vegetable oil as an ingredient, and the only way I could get high quality chocolate is to buy fancy chocolate bar brand (like Callebaut, Ghirardelli, Godiva, Guittard, etc) - but their chocolates were all flavored and sub-ideal cocoa butter %. Even brand-names baking chips weren’t suitable.
High quality chocolate seemed to only be sold wholesale, meaning I had to buy a ton at once (which is not good for a one-time gift) or I had to buy smaller packages from online retailers at disproportionately high price. There also didn’t seem to be any chocolate stores in Chicago that were accessible by public transportation, and I couldn’t just leave work to buy chocolate.
In the end, I just dropped $60 on 2 pounds of chocolate (with an additional anti-melt protection fee). The chocolate melted during shipping anyways (R.I.P $5).
Unless you plan to eat chocolate for months, my recommendation for buying high quality (“couverture”) chocolate is just buying fancy, brand-name bars that display the percentage of cocoa on them - despite the high average cost.
Creating A Model & Mold
(Aside) If you have deep pockets…
Professional services that create custom chocolate molds and packaging exists! The problem is that they’re geared towards professional clients, and are too expensive for a hobbyist.
Creating A Model
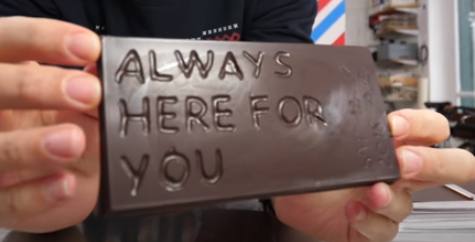
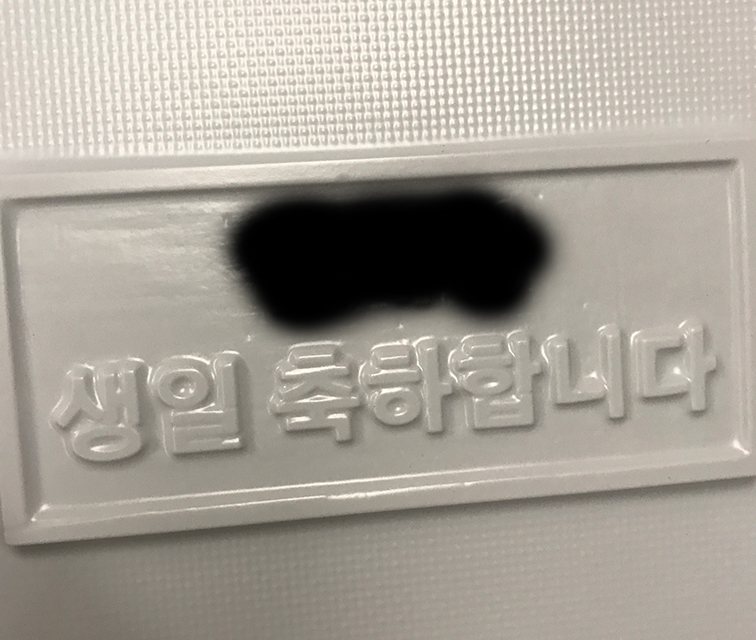
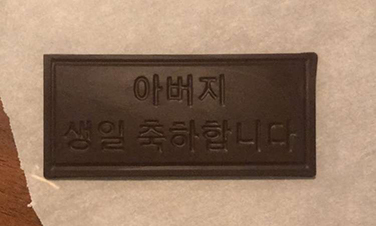
The next part of the project was to create the actual bar shape for my dad’s present. I had a couple of ideas in mind, but ultimately I wanted to say “Happy Birthday Dad” in English or Korean (아버지 생일 축하합니다 - a formal way of wishing happy birthday).
Since this is a chocolate bar with words, we can create a simple one-part mold by thermoforming a piece of plastic onto a master model. I had access to more sophisticated tools on hand because I had access to the University’s Media, Arts & Design Center! Meaning that I had a couple of ways to form a template. The only complication is that I wanted precision, clean edges, and clean curves.
3D Printing (No)
Although 3D printing is great for prototyping model and could give me computerized precision to form the actual bar - the actual printing time and resolution (texture of the print) made it impractical as a way of creating templates, in addition to being a waste of filament.
Carving Wood (No)
I like the idea of using wood as the master template, but carving was too imprecise/messy. Any handwriting in the wood would look awful if it were done by me.
CNC’ing Wood (No)
A Computer Numerical Control carving/milling/engraving machine would be perfect for my goals, but the CNC machine available was a desktop engraver. A couple of test runs with this machine were not very promising. The engraver wasn’t strong/consistent enough to cleanly shave off wood for an engraving. I wish I had taken a picture, but the results weren’t amazing.
Laser Cutting Wood (Yes)
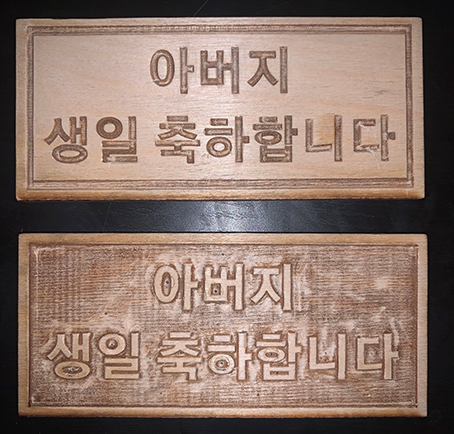
This is a hacky solution, but I ended up using multiple passes on a laser cutter (Universal Laser Systems VLS 6.6) on a piece of wood. Each pass burns/etches a layer of wood that gives it a deep (and accurate) engraving. This approach is not an ideal use of a laser cutter, but it was the only option that provided me the precision and automatic computer fonts I wanted. An added bonus is that the vectorization within the template allows me to create bars as big/small I want with a simple resize in Adobe Illustrator.
These two bars had the same text (16.7cm x 7.5cm), but etched in two different ways:
Creating a Mold
Now that we had a positive model (our chocolate bar), I needed to create a negative mold in that shape.
Various Silicone Rubber/Mold Making Approaches
Oddly enough, I had a difficult time getting my hands on liquid rubber/putty molds. I lived in a major city (Chicago), so all these other resources should have been accessible. However, the hardware stores near me didn’t have them in stock and the only choice on Amazon was $50. Services that sell putties/liquids for creating food molds exist. At the time I was stingy because the shipping costs were so high, so I avoided using them. In retrospect, I should have at least experimented with these expensive silicone because the alternative approaches ended up indirectly costing a lot of money (traveling, wasted materials, time).
Thermoforming A Mold
Disclaimer: I think thermoforming is a great way to make these chocolate molds, but my unique situation/timing made me regret this choice.
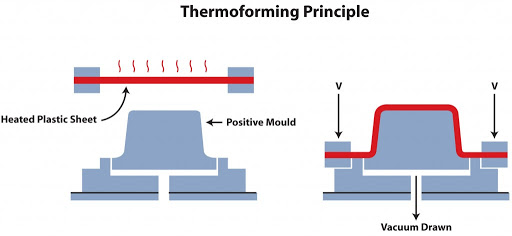
Anyways, the idea behind thermoforming is to heat a piece of plastic where it’s flexible, wrap it over the model, and use vacuums underneath to suck out air to form a tight fit. This has the added benefit of creating thin plastic molds that are easily storable, last a long time, and easy to work with (i.e get the chocolate out).
The University’s art center (with a thermoforming set-up) was closed for the summer so I had absolutely no access to a high quality machine. There are guides about making Vacuum Forming/Thermoforming machine at home, where the power and quality could be much higher for the same price. I did not have the time, space or desire to make this machine in the 2 weeks I had. If you’re curious here are some resource excellent resources. D.I.Y Thermoforming 1, D.I.Y Thermoforming 2, D.I.Y Thermoforming 3.
The example channel I saw used Makyuu FormBox (which is just a mini-thermoforming machine). A new machine is around $700 - not to mention the incredibly expensive materials. Luckily I found a hacker space that had the Makyuu thermoforming machine.
I validated whether polycarbonate is food safe, and easy to use for thermoforming etc. Then I bought a few sheets of polycarbonate on amazon. Unfortunately I assumed that the Makyuu formbox would get hot enough to properly heat the polycarbonate (it did not) that I purchased online, but even with an additional heatgun it wasn’t hot enough to reach proper molding temperatures. In order to make it work, I had to use Makyuu’s proprietary2 “food safe” sheets (that I couldn’t find any additional information online if they were ACTUALLY food safe aside from the company website).
Note for people who want to do something similar: If you look closely at my wooden chocolate bar models, you’ll see very small drill holes in the engraved parts of both molds. This is to let the vacuum (under the thermoformer) suck out more air and more tightly wrap the mold. This did not have any noticeable effects on the plastic mold and produced better engravings - I would recommend doing this.
Actually Tempering Chocolate
Earlier I described how to abstractly temper chocolate. The only issue with all of these methods for tempering chocolate is that these methods normally include a “seed” chocolate that starts a chain reaction of beta crystal formation (a.k.a the seeding method).
My problem was that all of my chocolate had melted and reformed into a huge blob I had no seed chocolates. Creating tempered chocolate from scratch is possible, just incredibly hard.3
There are a ton of ways to temper chocolate from scratch that involve a marble table, double boiler, sous vide, food processor & heatgun, and a microwave.
All of these methods (except for the sous vide) involved a thermometer or something else I didn’t have. Fortunately my friend had a sous vide, and so I went sous vide method! The added benefit of the sous vide is that it is idiot proof! As long as you use the correct temperatures, the chocolate should be able to temper properly.
“Idiot Proof” is a Lie
Despite this solution being promised as idiot proof by the internet - I could never get the chocolate to temper. This had to do with the fact that my chocolate came untempered, so the exact methods described in other articles wouldn’t work. In theory I could have formed beta crystals with the sous vide method from scratch, but I was leaving the chocolate in the heated water bath for too little time (1-2 hours) and without proper agitation. If I had to do it from scratch, I would have to constantly shake up the chocolate in the (HOT) water for 3-7 hours. Due to my deadline - I had just given up and poured the chocolate into my molds.
Results & Conclusion
In Conclusion, Chocolate is stupid.
Anyways, I’d like to think that the end result looked good and tasted good! I think I nailed the aesthetic look of the chocolate bar. I half succeeded with the flavor, although the taste was good (because I used good tasting chocolate), I completely failed with tempering the chocolate for a good texture/look. My goal to manage costs was an absolute failure. I told my dad I spent around $80 (mostly for the unused chocolate), but including transportation costs, acquisition of materials, hacker-space membership fees it came up to a $200.
In retrospect, I should have taken more steps to evaluate how I was spending money and readily give-up on certain ideas (like needing to thermoform a bar mold or not finding alternative ways to temper chocolate) after a few road blocks. My stubbornness and desire to make certain solutions work definitely hurt more than it helped this time. I’d advise anyone else to learn from my mistake and be willing to try alternative approaches.
Next Steps (if there are any)
This process has been enlightening and made me realize that chocolate is some incredibly serious business. If there is a next time, I would experiment with buying cocoa butter and trying to form seeds with a seeded cocoa butter called “cocoa butter silk”. Chocolate companies sell this silk, for instance Callebaut calls it Mycryo - but the spirit of this blog is to do it (relatively) from scratch.
Next, I would love to get my hands on cocoa nibs and make chocolate liquor from scratch.
Excellent Resources that I didn’t link in the blogpost
Additional Readings on Chocolate (Cacao Bean to Bar):
Chocolate Alchemist - highly recommend
Ann Reardon’s tutorial on Chocolate from bean to bar
Tempering Chocolate (from a chocolate company)
Tempering Chocolate (from serious eats)
Commentary Footnotes
-
Personally, I think bloomed chocolate tastes fine, but the texture definitely makes it an unpleasant experience. ↩
-
This is the worst and I hate your company if you do this. I understand WHY businesses do this, but it doesn’t mean I have to like it. ↩
-
Almost a year later, I realized I could have bought 100% cocoa chocolate from Whole Foods and used that as my seed. This is a HUGE mistake on my end… ↩